临安
1
前言
在使用Obsidian的时候,我很在意外观样式这个问题,毕竟几乎一天都对着它。在使用社区的第三方主题时,虽然也觉得有很多好看的,但总是会在使用中发现这样那样的问题,比如字对不齐、行间距不够高、图标歪了或侧边栏有点碍事之类的,更不要说安装了第三方插件之后了。因此我就开始学着自己在原生主题基础上改一改CSS,在这个过程中发现了很多已有的好资源,慢慢地也积累了一些,想着或许有别的小伙伴也需要,就在这里分享一下。
本楼中列出的资源是我自己在用的时候收集整理的,每一项我都会尽量写明出处,权利归创作者所有,如果贴出来有任何不妥我会立刻删除。在此感谢分享经验的大佬们!
本楼我会一直不定期的维护添加,比较大的资源集合会修改在主楼,比较零散的可能就在下面的回复里添加了,不然主楼太长。欢迎有优质资源的小伙伴在此分享。
首先列举两个CSS相关的基础教程,大家其实可以学会了之后自己试着改,想改哪里点哪里:
每一个片段的用途一般会写在/**/包围起来的注释里,不会特别复杂,应该还是比较好懂的。
GitHub资源
英文论坛和Discord
这两边信息都非常多,而且很碎,所以我只搜集了一些我自己感兴趣的:
.modal-bg { backdrop-filter: blur(5px); }
- Discord@pseudometa:将六级标题修改为一种特殊的类
Admonition样式:
/* Pseudo-Admonitions For H6 only (without following blocks). Based on some CSS from @SlRvb#3223 & @Eleanor#3466 Konik */
.markdown-preview-view h6 {
	padding-left: 0.3em;
	padding-bottom: 0.5em;
	padding-top: 0.5em;
	background-color: var(--background-secondary);
	margin-bottom: 0;
	border-left: 5px solid var(--text-muted);
	font-size: 1em font-style: normal;
	color: var(--text-normal) !important;
}
.markdown-preview-view h6 .heading-collapse-indicator.collapse-indicator.collapse-icon {
	display: none;
}
.markdown-preview-view h6:before {
	content: ":information_source:";
	padding-right: 0.5em;
}
有很多样式是可以在基础样式上修改得来的,可以多多尝试Ctrl + Shift + I之后自己修改想处理的元素,大部分时候都是可以解决的,我也在不断地摸索,自己修改成功了一项之后也是很有成就感的。
祝你的Obsidian越来越称心顺手~
21 个赞
临安
2
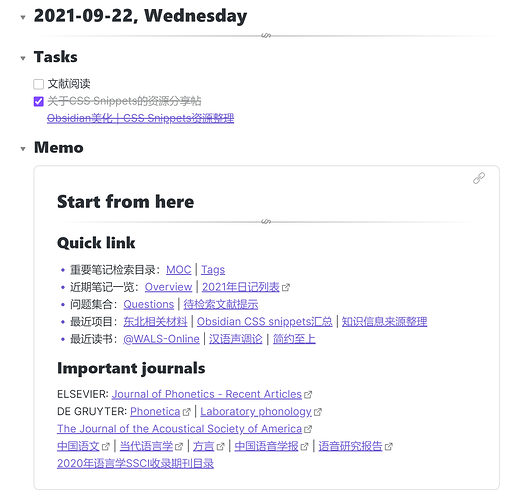
抛砖引玉一下,我自己试着写的一个把插入元素(如块引用、标题引用等)改成卡片的样式:
/* === 预览和编辑模式下的卡片样式,可配合oz插件 === */
.markdown-preview-view .markdown-embed, .markdown-preview-view .file-embed {
  border: 1px solid var(--background-modifier-border);
  border-radius: 8px;
  padding: 0px 24px;
  margin-top: 8px;
  display: block;
  /*box-shadow: 0 0 20px 0 #ecedee;*/
}

.markdown-preview-view blockquote {
    border-radius: 0;
    border: 0px solid var(--text-accent);
    border-left-width: 5px;
}
.oz-transclusion-widget {
    padding: 3px 3px 3px 19px;
    border: 1px solid var(--background-modifier-border) !important;
    border-radius: 8px;
    /*box-shadow: 0 0 20px 0 #ecedee;*/
    margin-top: 6px;
}
/* === 嵌入元素去掉标题栏,这个是借鉴别人的但是我找不到出处了orz === */

.markdown-embed-title, .file-embed-title {
    font-size: 0;
}
.markdown-embed-title {
    height: 0;
}
11 个赞
我说怎么没看出来区别,原来是我用的主题已经写成卡片样式了。赞!
我分享一个刚从orange主题里扒下来的给双链加图标的css:
/* 引用文件时,文件名前面会出现 “文档” icon */
.markdown-preview-view a.internal-link::before {
  margin-right: 4px;
  margin-left: 2px;

  content: '';
  background-image: url("data:image/svg+xml,%3Csvg t='1626093724345' class='icon' viewBox='0 0 1024 1024' version='1.1' xmlns='http://www.w3.org/2000/svg' p-id='3856' width='200' height='200'%3E%3Cpath d='M896.5 328.5h-256c-13.3 0-24-10.7-24-24v-256c0-13.3 10.7-24 24-24s24 10.7 24 24v232h232c13.3 0 24 10.7 24 24s-10.7 24-24 24z' fill='%230A59F7' p-id='3857'%3E%3C/path%3E%3Cpath d='M896.5 1000.5h-768c-13.3 0-24-10.7-24-24v-928c0-13.3 10.7-24 24-24h512c6.4 0 12.5 2.5 17 7l256 256c4.5 4.5 7 10.6 7 17v672c0 13.3-10.7 24-24 24z m-744-48h720V314.4L630.6 72.5H152.5v880z' fill='%230A59F7' p-id='3858'%3E%3C/path%3E%3Cpath d='M704.5 792.5h-384c-13.3 0-24-10.7-24-24s10.7-24 24-24h384c13.3 0 24 10.7 24 24s-10.7 24-24 24zM704.5 632.5h-384c-13.3 0-24-10.7-24-24s10.7-24 24-24h384c13.3 0 24 10.7 24 24s-10.7 24-24 24zM704.5 472.5h-384c-13.3 0-24-10.7-24-24s10.7-24 24-24h384c13.3 0 24 10.7 24 24s-10.7 24-24 24zM448.5 312.5h-128c-13.3 0-24-10.7-24-24s10.7-24 24-24h128c13.3 0 24 10.7 24 24s-10.7 24-24 24z' fill='%230A59F7' p-id='3859'%3E%3C/path%3E%3C/svg%3E");
  background-size: 16px 16px;
  transform: translate(0, 3px);
  background-repeat: no-repeat;
  display: inline-block;
  height: 16.8px;
  width: 16.33px;
}
效果好好看

8 个赞
临安
6
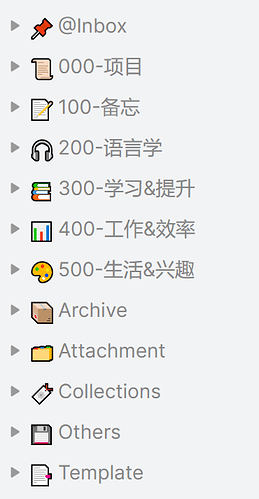
补充一个给左侧边栏添加小图标的片段。这个也是别的大佬写的,但是我当时忘了记出处了,所以真的非常抱歉……如有侵权我立刻删除!
这是预览样式:
/* 给左侧边栏文件夹前添加图标,""内图标和文件夹名称请自行修改 */
.nav-folder-title[data-path^="@Inbox"] .nav-folder-title-content::before {
    content: "📌" !important;
    position: relative !important;
    right: 5px;
}

.nav-folder-title[data-path^="000-项目"] .nav-folder-title-content::before {
    content: "📜" !important;
    position: relative !important;
    right: 5px;
}
.nav-folder-title[data-path^="100-备忘"] .nav-folder-title-content::before {
    content: "📝" !important;
    position: relative !important;
    right: 5px;
}
.nav-folder-title[data-path^="200-语言学"] .nav-folder-title-content::before {
    content: "🎧" !important;
    position: relative !important;
    right: 5px;
}
.nav-folder-title[data-path^="300-学习&提升"] .nav-folder-title-content::before {
    content: "📚" !important;
    position: relative !important;
    right: 5px;
}
.nav-folder-title[data-path^="400-工作&效率"] .nav-folder-title-content::before {
    content: "📊" !important;
    position: relative !important;
    right: 5px;
}
.nav-folder-title[data-path^="500-生活&兴趣"] .nav-folder-title-content::before {
    content: "🎨" !important;
    position: relative !important;
    right: 5px;
}
.nav-folder-title[data-path^="Archive"] .nav-folder-title-content::before {
    content: "📦" !important;
    position: relative !important;
    right: 5px;
}
.nav-folder-title[data-path^="Attachment"] .nav-folder-title-content::before {
    content: "🗂️" !important;
    position: relative !important;
    right: 5px;
}
.nav-folder-title[data-path^="Collections"] .nav-folder-title-content::before {
    content: "🔖";
    position: relative !important;
    right: 5px;
}
.nav-folder-title[data-path^="Others"] .nav-folder-title-content::before {
    content: "💾";
    position: relative !important;
    right: 5px;
}
.nav-folder-title[data-path^="Template"] .nav-folder-title-content::before {
    content: "📑";
    position: relative !important;
    right: 5px;
}
如果希望子文件夹的图标不要包括这些emoji,可以把代码中的^换成$。感谢@uncoverman 大佬的指点。
13 个赞
hob
(hobby)
8
有图片并排显示的效果吗?之前是MD方式觉得不方便。
Keith
(Keith)
9
我记得 在Minimal_Orange这个主题中,就有这个功能, 你可以查一下.
大概是调用了img-grid.css然后在相应的笔记里的YAML 中写 cssclass: img-grid
之后就可以按照自己想并列几张就几张的操作了
我记得,官方已经是图片并排了,如果你的图片尺寸合适,它会自动并排。如果你那里看不到这个效果,可以关闭主题看看。
如果官方的并排不能满足你的需求,就蹲一个片段吧
1 个赞
Quen
12
iconFolder比较麻烦吧,自己要去找一堆图标,而且关键的是用不到那么多图标,css是要省很多事情的。
1 个赞
Nice
13
用 margin-right: 5px; 避免遮盖图标
我在默认主题下用了一些css片段,设置成blue topaz以后发现这些片段有一部分失效了,请问这是什么原因呢?应该怎么解决?
独乐乐
16
好喜欢楼主的美化效果呀,可以分享下你使用的CSS片段吗?
1 个赞


