2023.10.12 update:
为避免歧义,给模板里的 YOUR_KEY,包上了引号。
2023.10.17 update:
为方便调试,在模板中添加了中间变量输出。
在正文里添加了关于常见问题的备注。
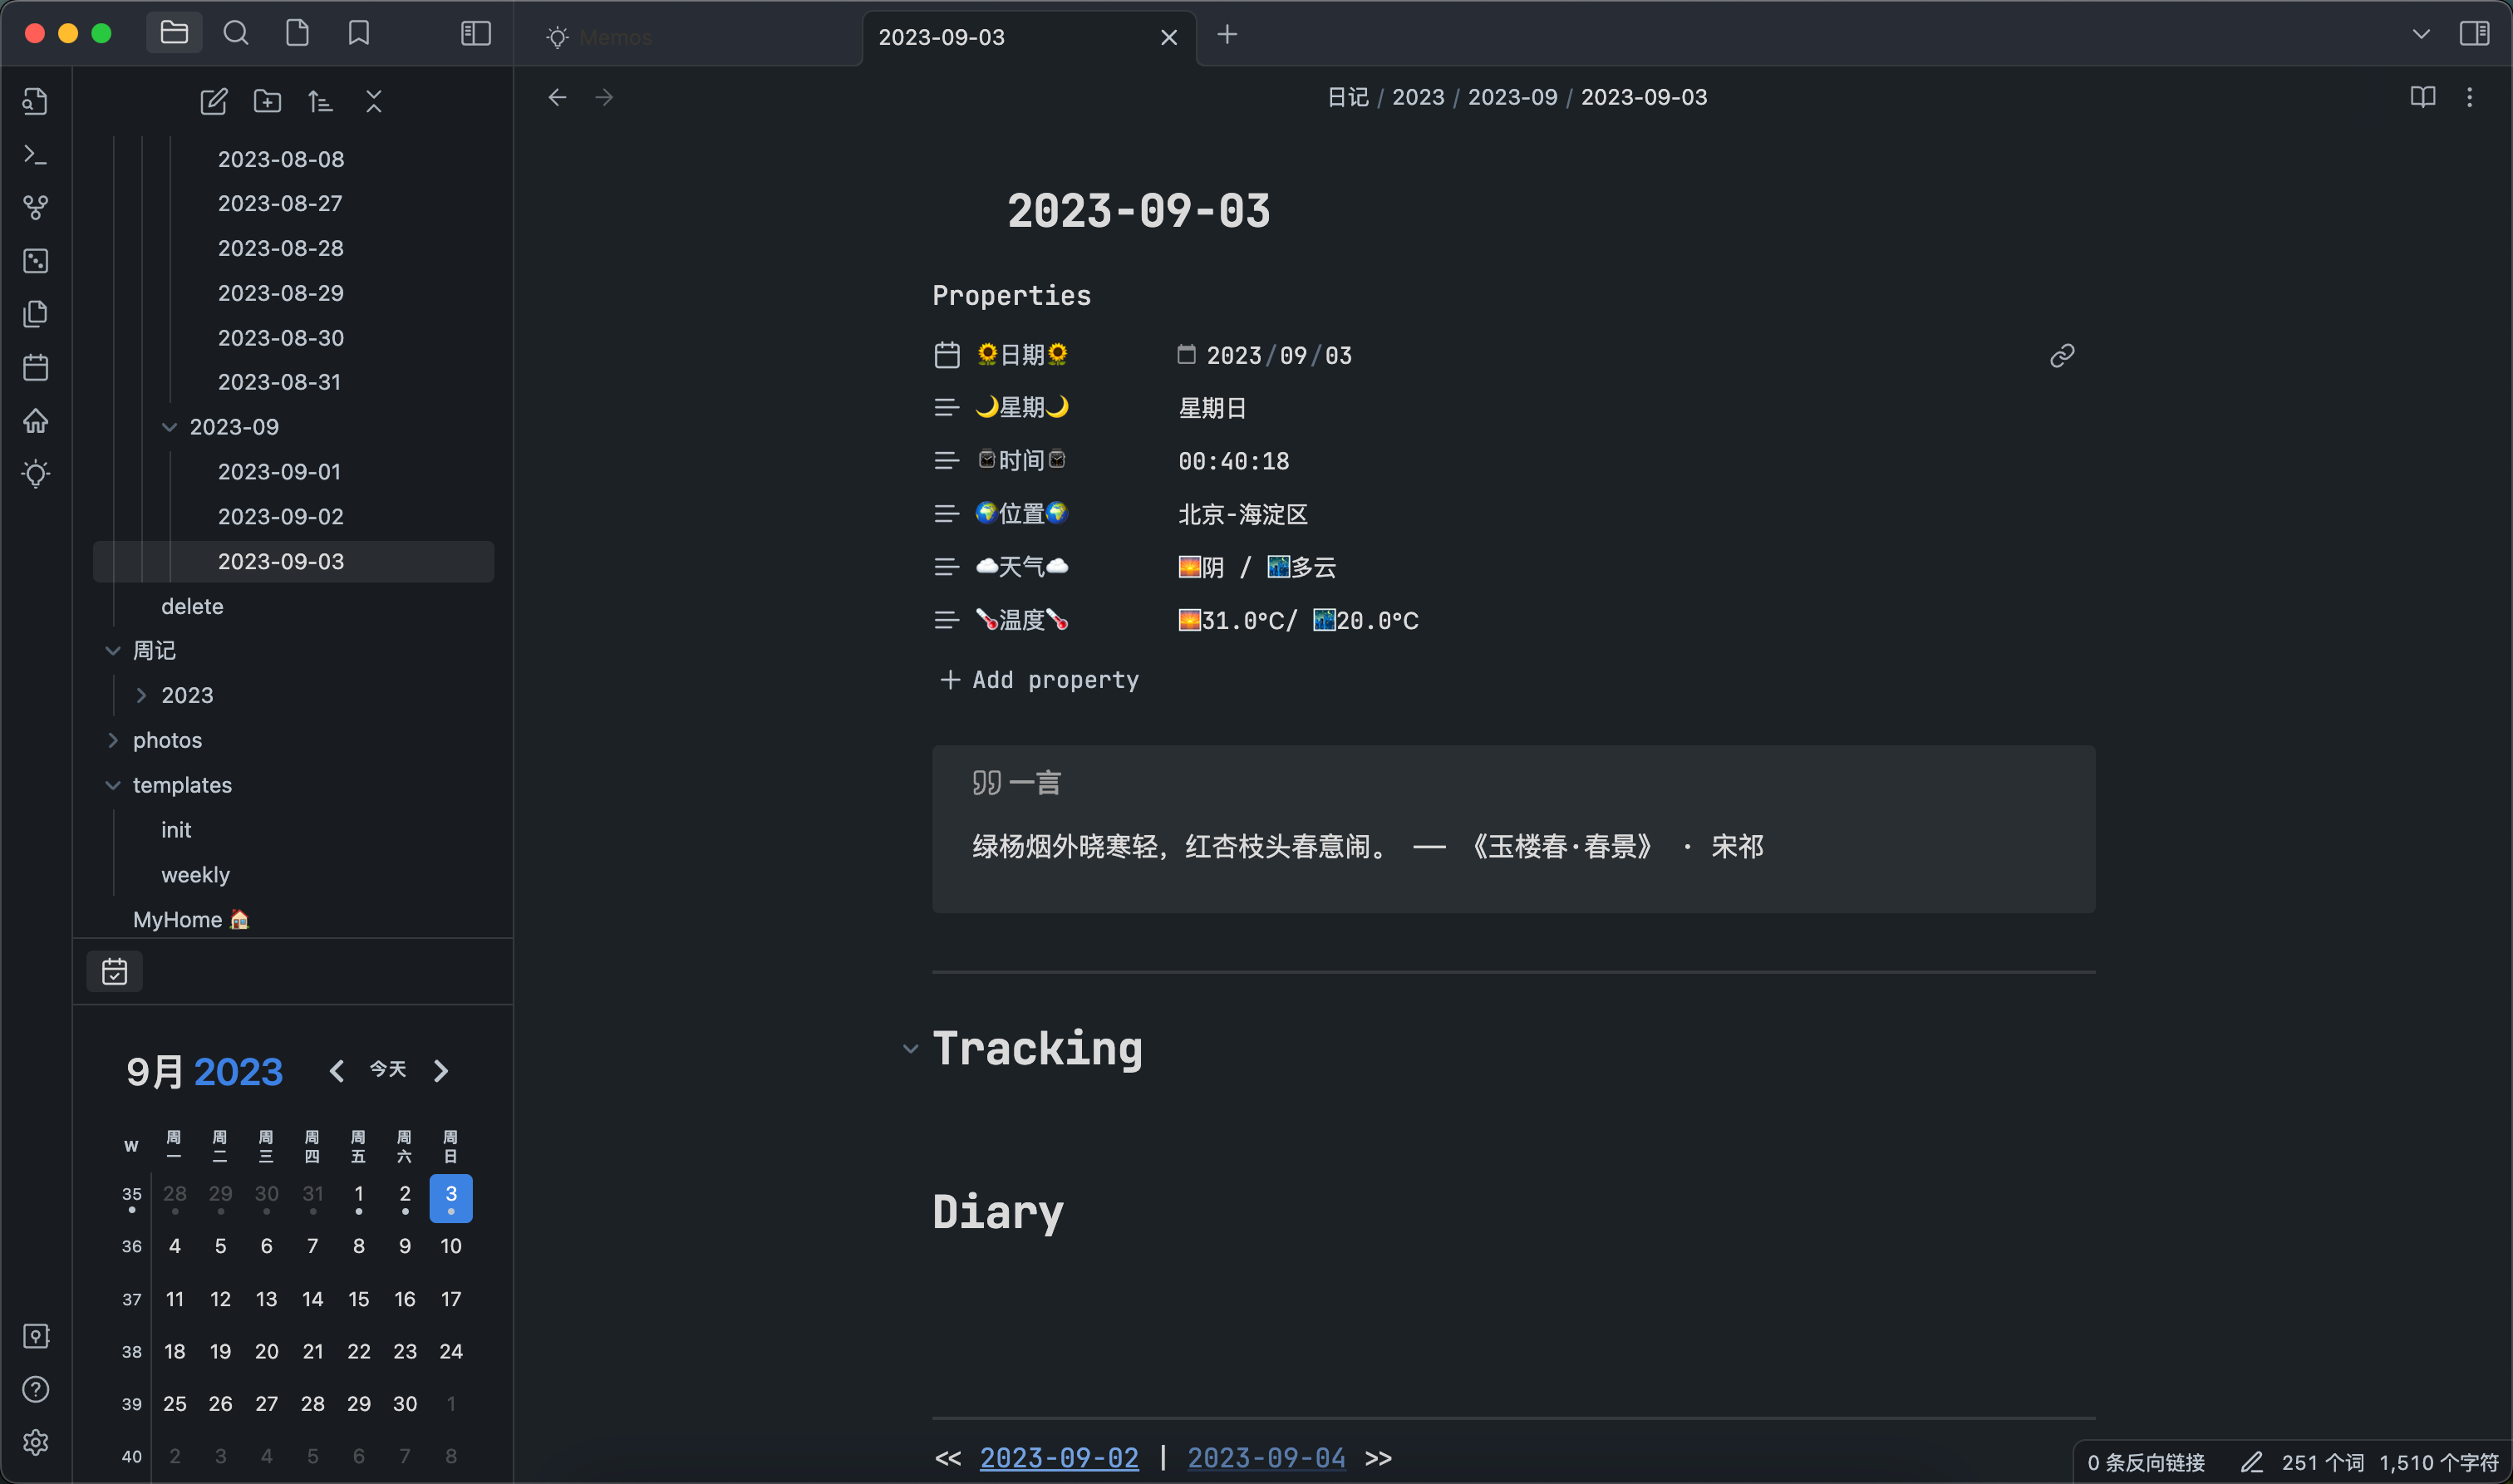
在Obsidian的新版本1.4中新增加了Properties这一特性, 可以让我们方便地在文档头部添加一些文档相关的属性。之前曾经分享过如何在文章中添加天气信息【搭建你的日记本】在文章正文中添加天气信息,对于日记本而言,创建日记的日期、星期、时间、天气等都是与当前文档相关的信息,很适合放入Properties中。这篇文章将会介绍如何使用Properties 与 templates 实现一个日记的模板。
首先先展示一下最终的成果,每次创建新日记时都会自动生成如下的内容:
模板的原理
Obsidian有一个核心插件日记,在这个插件中可以指定创建日记时所使用的模板文件。在创建一篇新的日记时,Obsidian会去按照你指定的模板文件位置去读取模板文件,并将其填充上动态的内容(例如创建日期)。但是原生的模板功能有限,这里使用了 Templater 这个第三方插件来增强模板的能力。

这个模板分为四个部分:
- Properties
- 一言
- 日记正文
- 前一天与后一天的链接
下面分别介绍如何生成这四个部分
Properties
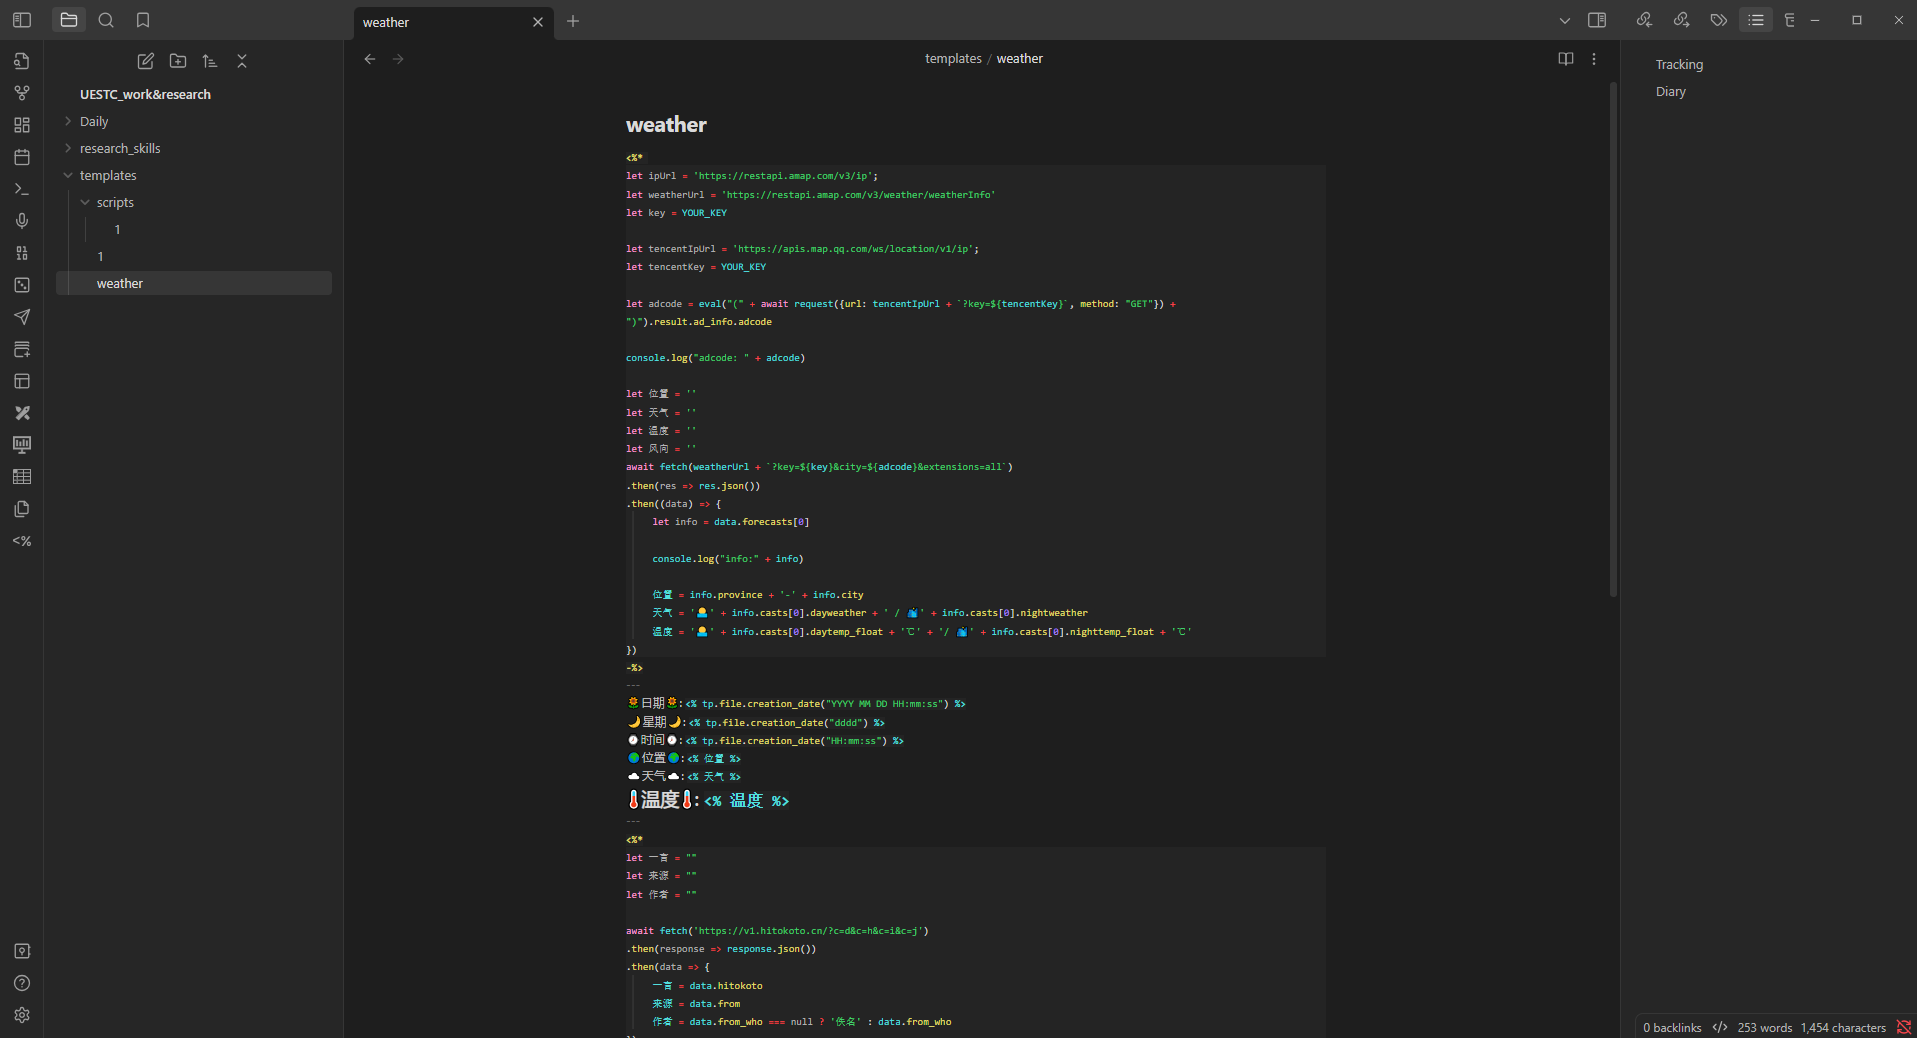
Properties 要求必须写在文件的开头,并且使用YAML的语法,所以在模板的开头要先用 Templater 获取需要的数据,然后再填充到开头的 Properties 里面,关于请求天气信息的代码可以参考【搭建你的日记本】在文章正文中添加天气信息 中的解释。
2023.10.17 update:
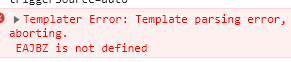
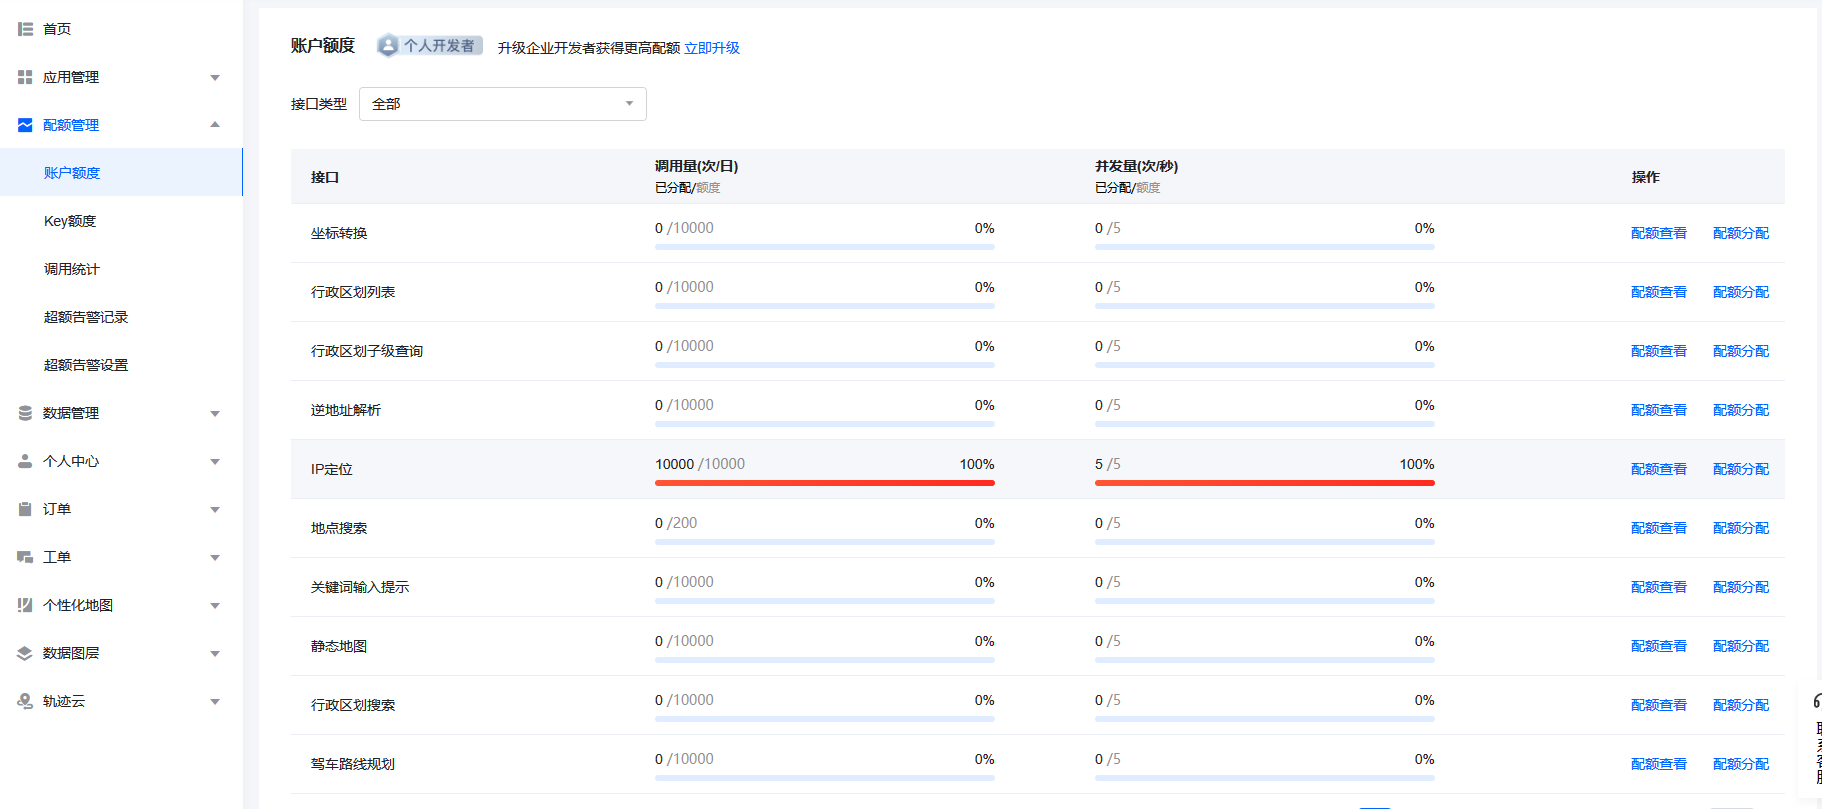
在使用腾讯API进行ip定位时可能需要预先分配额度,否则API会返回undefined
(感谢 【搭建你的日记本】使用 Properties 与 templates 实现一个日记模板 - #26,来自 32019121 指出这个问题)
<%*
let weatherUrl = 'https://restapi.amap.com/v3/weather/weatherInfo'
let key = 'YOUR_KEY'

let tencentIpUrl = 'https://apis.map.qq.com/ws/location/v1/ip';
let tencentKey = 'YOUR_KEY'

let adcode = eval("(" + await request({url: tencentIpUrl + `?key=${tencentKey}`, method: "GET"}) + ")").result.ad_info.adcode

console.log("adcode: " + adcode)

let 位置 = ''
let 天气 = ''
let 温度 = ''
let 风向 = ''
await fetch(weatherUrl + `?key=${key}&city=${adcode}&extensions=all`)
.then(res => res.json())
.then((data) => {
	let info = data.forecasts[0]

	console.log("info:" + info)

	位置 = info.province + '-' + info.city
	天气 = '🌅' + info.casts[0].dayweather + ' / 🌃' + info.casts[0].nightweather
	温度 = '🌅' + info.casts[0].daytemp_float + '℃' + '/ 🌃' + info.casts[0].nighttemp_float + '℃'
})
-%>
---
🌻日期🌻: <% tp.file.creation_date("YYYY MM DD HH:mm:ss") %>
🌙星期🌙: <% tp.file.creation_date("dddd") %>
⌚️时间⌚️: <% tp.file.creation_date("HH:mm:ss") %>
🌍位置🌍: <% 位置 %>
☁️天气☁️: <% 天气 %>
🌡️温度🌡️: <% 温度 %>
---
一言
一言是一个“一句话服务”,它提供了一个接口,每次请求它都会返回一句话,我把它添加到日记里也是想每天都能收获一句不同的话,算是一个小惊喜。
这部分同样是用 js 来向一言发起请求,然后将内容展示出来。其中展示的时候用到了 Obsidian 的 Callout 特性。
<%*
let 一言 = ""
let 来源 = ""
let 作者 = ""

await fetch('https://v1.hitokoto.cn/?c=d&c=h&c=i&c=j')
.then(response => response.json())
.then(data => {
	一言 = data.hitokoto
	来源 = data.from
	作者 = data.from_who === null ? '佚名' : data.from_who
})
-%>
>[!quote] 一言
 <% 一言 %>  —— 《<% 来源 %>》 · <% 作者 %>
正文
正文部分很简单,我将其分为了 Tracking 和 Dirary 两部分,其中第一部分用来记录间歇日记,第二部分则是自己当天的所思所感。这部分只需要在模板中原样写下这两个标题即可。
# Tracking

# Diary
链接
这部分使用 Templater 的语法即可,参考 如何自动建立前一个记录的链接
<< [[<% tp.date.now("YYYY-MM-DD", -1) %>]] | [[<% tp.date.now("YYYY-MM-DD", 1) %>]] >>
总结
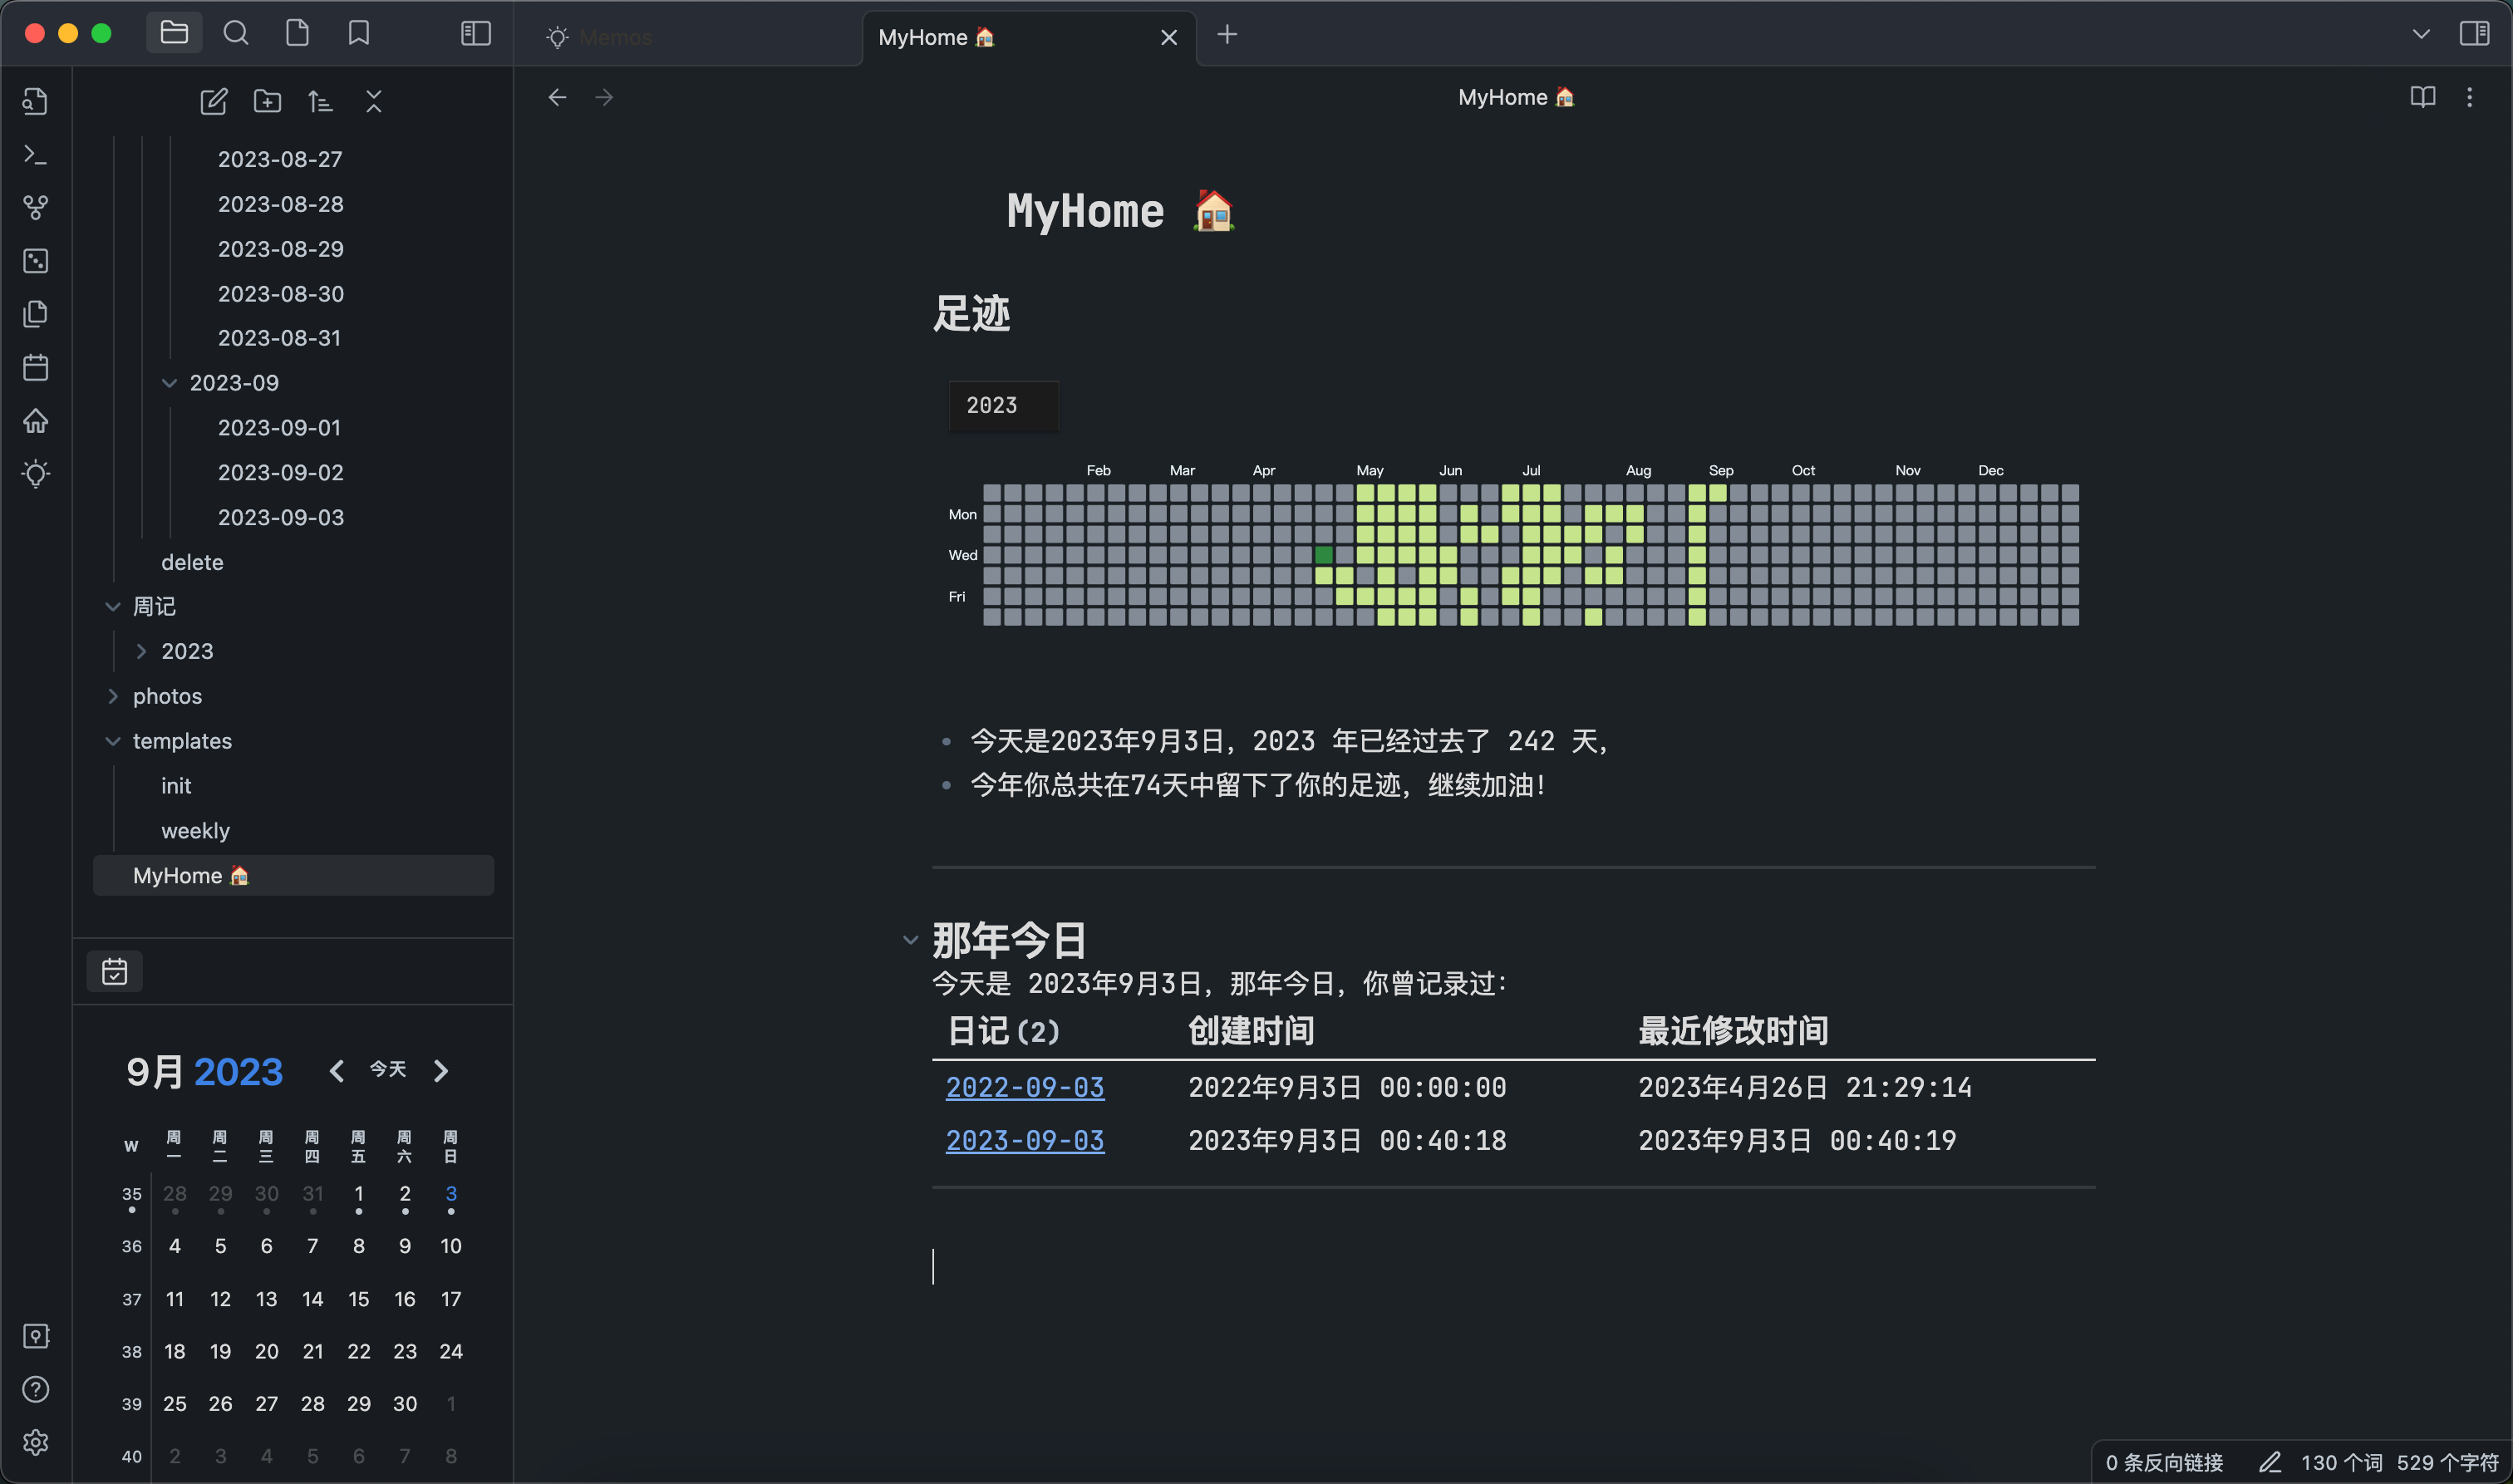
相较于原本的方式,Obsidian 新版本所提供的 Properties 能以更加友好的方式展示文件的元信息,并方便了我们的查询,通过 Dataview 等方式可以方便筛选出符合要求的日记,实现例如那年今日这样的功能。
完整模板
<%*
let weatherUrl = 'https://restapi.amap.com/v3/weather/weatherInfo'
let key = 'YOUR_KEY'

let tencentIpUrl = 'https://apis.map.qq.com/ws/location/v1/ip';
let tencentKey = 'YOUR_KEY'

let ipResult = eval("(" + await request({url: tencentIpUrl + `?key=${tencentKey}`, method: "GET"}) + ")").result
console.log("ipResult: ", ipResult)

let adcode = ipResult.ad_info.adcode
console.log("adcode: " + adcode)

let 位置 = ''
let 天气 = ''
let 温度 = ''
let 风向 = ''
await fetch(weatherUrl + `?key=${key}&city=${adcode}&extensions=all`)
.then(res => res.json())
.then((data) => {
	let info = data.forecasts[0]

	console.log("info:" + info)

	位置 = info.province + '-' + info.city
	天气 = '🌅' + info.casts[0].dayweather + ' / 🌃' + info.casts[0].nightweather
	温度 = '🌅' + info.casts[0].daytemp_float + '℃' + '/ 🌃' + info.casts[0].nighttemp_float + '℃'
})
-%>
---
🌻日期🌻: <% tp.file.creation_date("YYYY MM DD HH:mm:ss") %>
🌙星期🌙: <% tp.file.creation_date("dddd") %>
⌚️时间⌚️: <% tp.file.creation_date("HH:mm:ss") %>
🌍位置🌍: <% 位置 %>
☁️天气☁️: <% 天气 %>
🌡️温度🌡️: <% 温度 %>
---
<%*
let 一言 = ""
let 来源 = ""
let 作者 = ""

await fetch('https://v1.hitokoto.cn/?c=d&c=h&c=i&c=j')
.then(response => response.json())
.then(data => {
	一言 = data.hitokoto
	来源 = data.from
	作者 = data.from_who === null ? '佚名' : data.from_who
})
-%>
>[!quote] 一言
 <% 一言 %>  —— 《<% 来源 %>》 · <% 作者 %>

---
# Tracking


# Diary


---
<< [[<% tp.date.now("YYYY-MM-DD", -1) %>]] | [[<% tp.date.now("YYYY-MM-DD", 1) %>]] >>